Did you know that the Novation Zero SL MK2 comes with built-in templates for editing TX81Z preset parameters via MIDI CC?
Neither did I, until I started searching for editors for my recently acquired Yamaha TX81Z synth.
If you’re unfamiliar, it’s a classic FM synth with some classic presets, including the legendary Lately Bass.
Unfortunately, despite it having a great selection of presets, it’s notoriously difficult to edit them. Editing presets requires some serious menu-diving and button pushing, and it’s enough of a hassle to really put a damper on creativity when trying to modify presets. For this reason, despite it being a true Techno and House classic synth, they aren’t pricy.
BUT – if you have a decent way to edit the presets, it becomes a great (cheap) addition to your studio. So – I picked one up and went on a search for a decent editor. There are some software editors that work well and can be quickly found on the web – but I was hoping to find something that would allow me to easily edit patches with a hardware interface via MIDI CC.
It turns out, that I had one sitting in my studio. The Novation Zero SL MK2 comes bundled with a template for the TX81Z that makes tweaking parameters on the synth MUCH easier. Combined with a macro on my Maschine that I have set to select presets (again by MIDI CC), I’ve discovered a great way to make more of this great synth!
Interested? Find out more about it, in this quick video.
“Grass Roots House“ is a project I’ve recently been working on for sample label Niche Audio, creating 15 kits inspired by my love of the classic raw House sound of the early 90s coming out of Chicago & Detroit.
It is out now and available as Maschine and Ableton Live kits, plus additional formats.
The “Golden Era”
For many, the early 90s is considered a golden-era for dance music, paralleling a similar time for Hip Hop. The discussion of WHY music from this era has such long-lasting appeal ultimately comes back to a certain “sound” that fans of the era love and modern producers often try to emulate.
So – what exactly IS behind this sound? I’ve touched on some of these things in previous posts, but to summarize it again here, one of the most popular sounds in dance music has roots in healthy doses of analog noise, and production techniques guided by simplicity and limitation.
Less equals more
An excellent example of this simplicity in the studio setups of the era is Larry Heard’s gear used in the production of the now anthemic “Can You Feel It”. He described his setup in creating the track as follows :
“I used a Roland Juno-60 and a TR-909 drum machine. That’s all the gear used on the song,” he says. “I had two cassette decks—there were no digital recorders or even multi-track recorders—and I did one take, one pass, on one tape, then ran it back to the other one, played some other parts by hand that I wanted to add, and that was pretty much the recording process. It wasn’t exactly the Beatles.”
Of course, not all producers at the time used such limited studios, and, in fact, the photo here (taken circa 1997) shows that Larry Heard did around that time have more gear at his disposal. Nevertheless, it’s sure that most producers at the time would have been operating with relatively limited setups that would be based on the following:
One or more affordable (for the time) analog synths, often by Roland, Korg and Yamaha. (DX7, TX81Z, Juno 60 or 106, M1 are staple classics from the era).
Some sort of drum machine OR a sampler for beats. Sometimes both. (LinnDrum, Roland TR series, Akai MPC, E-mu SP1200, Akai S950, Ensoniq ASR10 are heavily used staples from the era).
An analog mixing desk (often a Mackie, Soundcraft or similar relatively cheap desk). Overdriving the inputs for rough n’ ready saturation and distortion was a common technique.
Whatever (typically on the cheaper side) outboard processing they could get their hands on. This would usually include a reverb and a delay as fundamentals, followed by additional FX such as filters, flangers and the like. (Think relatively cheap rack-mounted FX units such as the Alesis Quadraverb, Ensoniq DP4, Akai MFC42 etc.)
Some sort of analog recording medium (tape), or possibly ADAT
Rarely any computer for additional sequencing or automation. Sequencing was done with built in sequencers in the hardware. Manual fades, “scene changes”, channel-muting and FX modulation took place in real-time as the producer was bouncing down.
Sample, DIG, Sample, Dig!
Of course, with limited access to gear, the sampler was a go-to alternative. If you needed a sound, and didn’t have it, you could find it (or something similar) in a record and sample it. The prevalence of vinyl in many homes at the time meant that sampling inspiration from a family or friends’ collection was usually close at hand.
Similarly, if you didn’t have a piece of gear, but a friend did, a few days sampling up their synth could be the answer. Gear trading for this reason, was not uncommon.
One thing worth noting, and an important aspect of the golden era sound, is that samplers of the era had much lower sampling resolution, and often led to noticeable artifacts. The sampler, in this way, colored the sounds and unlike the ultra-clean high-resolution samplers of today never created a facsimile of the material.In addition, very limited sampling time (memory) necessitated unique sampling techniques that further colored the sound.
a healthy dose of dirt
A bi-product of the heavy use of often crackly vinyl for samples, sampling hardware through noisy mixing desks & FX units powered by often buzzy home power outlets, and lower sampling resolution is that samples of the era were often aliased and DIRTY.
If you then throw in the fact that people often RE-sampled sounds that had originally come from samples themselves, the noise and aliasing are compounded.
In isolation, these sounds are noticeably noisy. However, with creative filtering and EQ and placed with other sounds, the obvious noise is heavily reduced and for many becomes a pleasant character of the era. Truthfully, the 90s sound is DIRTY.
The Grass Roots Sound
I came up in the golden-era of House & Hip Hop and for many like me all of the above are recipes for true UNDERGROUND music. It’s dirty, not glossy. It’s rough around the edges. It relies on vibe, not complicated or high-end production tools. It’s not for everyone. It bangs.
I started Grass Roots Records back in ’92 with this sound coursing in my veins, and I hope I’ve transferred some of that vibe to the “Grass Roots House” pack. Enjoy!
In creating Grass Roots House the following was used:
The rise of “in the box” production has advanced many aspects of music production, and in the process brought the possibility of producing music at a high level to the masses. I’m a big fan of the modern DAW and the amazing software that is currently available to both bedroom producers and pros alike.
That said, I am still a fan of some more “archaic” formats, such as MIDI and Sysex, and I sometimes regret the fact that very new producers will probably never know how powerful a deeper understanding of these technologies can be in a creative context.
One of these vintage tools is the trigger or gate signal. These were generally pre-MIDI and essentially were a voltage signal that could be output from a hardware device. These signals would be sent to other hardware devices as a way of synchronizing playback of the various devices.
An extension of this was that these signals could be used to advance a sequenced set of notes by one note in a sequencer with each trigger that the sequencer received.
The Roland TR-909 TRG Out (Rim Shot)
The classic Roland drum machines included a trigger out that was associated with the Rim Shot as in the image of the TR-909 here.
So, a technique would be to program in a series of notes on something like the Juno 60 or SH-101 and then program in a rhythm pattern using the Rim Shot on the drum machine. With each trigger from the drum machine, the synth would step to the next note in the sequence, and once it reached the end of the sequence, begin again.
The result is that a producer could create an interesting progression of notes on the synth by simply manipulating the pattern of the Rim Shot trigger notes on the drum machine (these could be muted and still trigger the sequencer, so it was a matter of taste if they were actually heard or not). In fact, it is believed that one of the most famous bass lines in dance music was created this way by Larry Heard when he created “Can You Feel It”. Synthmania have kindly demonstrated how he would have done this with this nice video.
But what about the modern “in the box” producer? I was interested in finding out how a producer without a hardware sequencer or drum machine might be able to replicate this process. Fortunately, someone has kindly developed a great Max4Live plugin for Ableton Live users and it’s free! (I am hopeful that for those of you who aren’t using Ableton you will be able to find a similar type of plugin for your platform).
I’ve done a quick video demonstrating how this great free plugin called Live.Stepper can be used to emulate the classic trigger / gate sequencer technique below. My take – this is a great free plugin and it plugs a gap that exists. Kudos!
I hope some of you enjoy exploring this classic technique and come up with some great patterns!
Save on great audio plugins at Plugin Boutique. Click to browse all current offers.
If you’re using Native Instruments Maschine and Ableton Live, you may have struggled with a common question: what’s the best way to integrate the two?
Or, put another way, how can you make the most of Maschines’ intuitive hands-on hardware, and maximize the sequencing and arrangement features of Live?
I’ve been around the block on this question more than a few times and spent hours testing and revising different scenarios. In the end, I’ve ended up with what I think is the best way to integrate the two, leaving maximum flexibility and accommodating different workflows.
The answer, for me, is a template that routes each of Maschines’ 8 groups to 8 individual tracks in Ableton Live.
For maximum flexibility, the Ableton Live tracks are set up as external instruments, meaning you can not only route & record audio from each Maschine group into the individual Ableton tracks, but you can also record MIDI output from Maschine if you wish.
So, if you like to take advantage of Ableton’s excellent sequencing, mixing and processing features and essentially use Maschine as your sampler, this works well.
OR, if you are one who prefers to do all of your sequencing, mixing & processing work inside of Maschine you can. A nice advantage is that you can still use some of Live’s proprietary effects racks, MIDI effects etc by placing them on the relevant Ableton tracks.
NOTES:
*The first Maschine group in the template is for drums. Utilize Maschines’ dedicated mixer to pan and mix levels, and then bring the audio into Ableton as summed audio.
**When changing the sample on any Maschine pad don’t hit “reset”! It will also clear the routing. Instead, just drag a new sample onto any pad to replace it.
***This template requires Ableton Live 9 or later and Maschine 2.7.8 or later.
****Feel free to update the name of each group in the template if you wish. I’ve just named them in a way that works for me.
These days, most plugins come in both AU and VST format, and Macintosh (at least up to OSX) continues to support both formats.
When installing on a Mac, many users go with the default AU version all the time. But, does it matter? In fact, due to the way AU and VST plugins behave the answer is sometimes yes. Let’s examine why and when it matters.
MIDI OUT – VST vs. AU
VST plugins handle MIDI output very differently than AU plugins. More specifically, VST plugins have the capability of sending out MIDI signals (if they are programmed to do so by the plugin designer) and AU plugins do not. (At least that’s my experience)
This is WHY it does make a difference which version you choose.
TO TRIGGER OR NOT TO TRIGGER?
That is the question! If you can imagine an instance in which you would like to have your plugin act like a traditional external hardware instrument and be able to transmit a signal out, you should choose the VST version. This is WHEN it matters what type of plugin format you choose.
Think about the types of instruments that would traditionally have this capability – drum machines, synths & certain types of effects modules that use MIDI triggers (like arpeggiators or chord generators) quickly come to mind.
So, when installing plugins like this, ask yourself a quick question: do I want to be able to trigger other devices with the output of this plugin? If the answer is yes, and the plugin includes a VST version that is capable of transmitting MIDI, install it.
One prime example of just how much better VST use can be over an AU version is Plugin Boutique’s excellent Scaler plugin. When using the AU version, you are not able to trigger external plugins with it. This means that when you find a selection of chords you like, you have to manually drag the MIDI files into a channel you want to trigger and then manually edit the length of your chords to play a pattern.
With the VST version, you can just set it to trigger an external plugin and whatever you play is recorded, as you played it, into the external plugin track. This video demonstrates the process:
Below are a couple of additional examples I’ve created that demonstrate how useful VST MIDI output can be (using D16 Group’s excellent TR909 and TB303 emulations) Drumazon and Phoscyon.
In the end, it all depends on what you want from a plugin. From my perspective, VST still has some unique advantages.
Save on great audio plugins at Plugin Boutique. Click to browse all current offers.
The great loop. Whether it’s Hip-Hop or House, it is more often than not the foundation of a track. In fact, it’s become so much a part of modern music that we now have access to literally millions of pre-produced loops with the click of a mouse.
But, with all of this pre-made content perfectly looped and waiting for us to drop into our own productions, how do we really make our music our own?
One great way to achieve this is to alter your mindset. Start to think about the loops you purchase not as completed building blocks, simply to be put together in various combinations. When you instead start to think of them as great source material for your sampler, you’re moving in the right direction!
Let’s quickly look at 5 sampling tips to take loops from sample packs and make them your own.
Forget about the time!
These days, most any DAW or sampler will automatically stretch a loop to the tempo of your track. While this can be very useful, it’s not something you should just assume is always the best option. Why?
Turning off time-stretching forces you to take a snippet of audio that isn’t perfectly in time with your music and make it work. You won’t be able to just trigger the sample once and have it stay perfectly in time, so you’ll be forced to re-trigger the sample in a pattern that works with your tempo. In other words, you will be forced to add your own personality to the loop.
To do this, you will need to rely on features common in any sampler. Typically, this might include adjusting the sample start and end point, setting up new loop points, and adjusting the attack, decay, sustain and release of the sample.
Finally, it’s common that you’ll find that triggering the sample completely on the quantized grid doesn’t work. You’ll be forced to listen to your track and play it in a way that fits. The result will be a natural swing that makes your tracks feel less “cut and paste”.
Chop it up!
An extension of the first tip relates to the duration of the loop. While a great one bar loop can be just the right thing, having a bunch of them together can lead to a sense of rigidly structured repetition that becomes a bit stagnant. We’ve all been stuck in that one bar loop mode.
To add some spice, consider chopping some of your loops into shorter segments. A commonly used approach is to create a cool half bar loop as a foundation for things. Of course, you can then double this up to create a 1-bar loop, but if you use some of the techniques outlined in tip one (especially with regards to turning off automatic time stretching), you’ll have a 1 bar loop with some natural swing that can bring some much-needed life to your track.
*A shout-out to Erik Svahn who runs the amazing RawCutz Hip-Hop sample label for an inspiring conversation on this technique. Check out one of his nice Deep House tracks that uses this technique here and enjoy.
Stack ’em up!
One really fun way to take a sample pack loop and make it your own is to stack it with another sample. Again, we’re not just talking about taking a full loop and putting it with another full loop from a sample pack. There’s no doubt that this can yield cool results, but how much of your own creativity really went into that?
Finding another sample that you think goes well with it, and stacking the two (or more) before applying our first two techniques will yield some truly unique results. Setting up times where you are doing things like this, without actually planning on making a track, can also help break things up when you hit a creative wall. It takes you in the direction of sound design and forces you to start thinking of your sampler as the incredible tool that it is. If you haven’t yet played around with stacking samples, here’s a video I’ve done demonstrating how simple and effective it can be with a pad and bass sound.
Sometimes odd is good!
Purchased loops are almost always delivered in an even number of bars (1, 2, 4 etc.) The idea here is that they loop around in a way that is consistent with the most common (4/4) structure we’re likely to be writing our music in. In most cases, this makes sense and this consistency is something that we’ve grown to love and expect when listening to House, Hip-Hop etc.
But, there are times when taking a loop and shortening it so that it loops off the even bar grid is a really useful tool. A perfect example is live percussion loops. Having them loop in a different way from the majority of your track creates a constantly evolving variation in the way the percussion interacts with the rest of your elements, adding a much more human feel. It’s a great way to quickly get a few great variations of a percussive loop. Here’s a quick example of how to achieve this.
Not JUST a bit!
These days commercially sold samples are usually delivered at 24bit, minimum 16bit. From a sampling standpoint, the higher the bit rate, the more accurately the sampler is able to “describe” the sound sampled. It’s more accurate. Cleaner & more defined.
But, is this always the best thing? Not in my view. If you read my post on old school sampling techniques or the D16 Decimort review you’ll know that I’m a big fan of the character that older samplers with their lower bit rates imparted to sounds. In fact, the reason why some samplers are legendary has a lot to do with the way they colored sounds. What you put in isn’t what came out.
Think about this with your own music. Is having everything at 24bit always the best thing for your style? If you’re going for classic 90’s House vibes or Boom Bap Hip Hop, the answer is probably not.
My analogy is that bit depth can be a lot like colors. Would you paint a picture using only red? Not most of the time.
Like with colors in a painting, you will find that mixing bit rates creates levels of depth in your mix and the contrast you need to create your mood. Some sounds will be cleaner and more “present” and others grittier and more colored.
Try reducing the bit depth of your sample pack sounds and resampling them and you’ll soon see what I mean. Most any DAW will have some sort of bit reducer and most hardware or software samplers these days include some kind of way to emulate the older, more vintage feel of samplers that sampled with lower bit depth.
In the end…
In the end, the theme here is that samples are simply food for your sampler. Don’t think of them as the end-product, but rather a means to an end. Learn to explore your sampler and you’ll soon realize the possibilities are limitless. The sampler is truly one of the most powerful tools in your arsenal.
Two themes heavily influenced early House & Techno music production – limitation and technology. The intersection of these two things often resulted in the unique style that many of us now associate with that “classic” sound.
A prime example is the use of planed chords or parallel harmony. If you’re into the sound of producers like Kerri Chandler, Jovonn, Mood 2 Swing or even more current producers like Motor City Drum Ensemble, Legowelt, Soulclap, or Detroit Swindle, you’re familiar with this sound.
Let’s look at how the planed chords technique came to be a popular staple of House and Techno.
The Technology
Samplers ushered in the possibility of pulling audio from existing recordings. Things such as chords could be sampled and turned into new melodies.
The way samplers work, however, changed the way that chord progressions would be played. Normally, chords in a progression would vary between major and minor, depending on the root note the chord is built upon.
But, sampled chords remain fixed. It’s either a major or a minor chord you sampled. That won’t change, so your progressions with a sampled chord sound “different”. Samplers thus resulted in the popularization of a “new” style (with a very distinct sound) of chord progressions by early House & Techno producers. (Early 1900s composers like Debussy experimented with this, but it was not commonplace).
Chord progressions arranged in this way are now commonly referred to as “planed chords”.
The Limitation
Throw into the mix the fact that many House & Techno producers are not musically trained and it is not surprising that this method of sampling chords and creating progressions with them (also referred to as “parallel harmony”) became a staple of the genres from very early on.
Even if some producers were classically trained, the underground nature of the genres meant that most production was done in small studios, without access to the resources needed to use live musicians, who were more likely to stick to accepted music theory. Of course, access to gear was an issue as well. If you can’t afford to hire a string section or rent/buy an electric piano what do you do? You sample it.
Chord Memory
The sampler resulted in the popularity of this sound. But, there’s another technological advancement that helped push it along even more.
Some early synth manufacturers recognized the popularity of planed chords and understood that many producers might want to replicate that sound without having to sample the chords they played on their synth. Enter chord memory.
Chord memory essentially mimics what a sampler does, keeping the structure of your original chord intact, at the same time allowing you to trigger it across the range of your keyboard. Like a sampler, triggering the chord only requires striking a single key.
A few classic synths that really popularized this feature were the Korg Polysix and Memorymoog. It’s no surprise that you’ll find these synths all over classic House & Techno productions (along with sampled chords).
For many of us, chord memory still remains a popular feature. Parallel harmony just has “that sound” we’ve come to love. Some soft synth producers have also recognized this and include the feature. One such synth is Rob Papen’s Predator. Find out a bit about how it works in Predator in the video.
“Sample & Hold” is a really useful feature that is sometimes overlooked. It can quickly turn the shortest of sounds into a never-ending sonic landscape.
Here’s a quick video I’ve done, demonstrating it with the use of a great free reverb plugin, called Ambience. You can download Ambience and hundreds of other curated free plugins once you register at Plugin Boutique.
Save on great audio plugins at Plugin Boutique. Click to browse all current offers.
Here’s a useful tip on understanding basic scales for those of you who aren’t the greatest at music theory but want to start experimenting and make sure you are staying in complementary keys to your samples. First off, on any keyboard, each key (white or black) represents what is called a semi-tone.
With this in mind, depending on whether you are in a Major or Minor, the rule for determining the scale is as follows:
Major scale: Tone-Tone-Semitone-Tone-Tone-Tone-Semitone Minor scale: Tone-Semitone-Tone-Tone-Semitone-Tone-Tone
So how do you put those formulas to use?
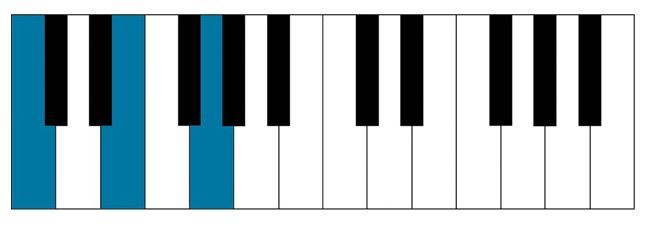
Let’s say you are starting out your track with a loop from a sample pack that is listed as being in Cmajor. If you put your fingers on the keyboard for a CMaj they will be on the blue keys below. (If you aren’t sure where your fingers would be placed for any chord, you can use this)
We are in a Major scale, so we’ll use the major formula. Moving from the first key in your chord (C) just count up key this way: Tone-Tone-Semitone-Tone-Tone-Tone-Semitone.
So what you would get is C – D – E – F – G – A – B – C. This is the scale of C, and all these individual keys will be complimentary. You can play them individually with your chord, or you can make complimentary chords using combinations of them. (C is a unique scale in that it’s Major scale is made of all white keys).
What if we started with a Dmajor though? Well, starting with our finger on D, if we then count up Tone-Tone-Semitone-Tone-Tone-Tone-Semitone we get the following: D-E-F#-G-A-B-C#-D. This is the scale of D, which includes some white and some black keys.
So again, these keys can be played in succession individually (let’s say to make a bassline to compliment your Dmaj) or they can be used in combination to create complimentary chords (like an AMaj or a GMaj for example).
So how can you put this to use in the studio?
Let’s say you find a sample from a sample pack and it’s in a CMaj. A great next step is to take some pieces of coloured tape and stick them to the keys in that scale – remember for a major just take the root key and then count up Tone-Tone-Semitone-Tone-Tone-Tone-Semitone, sticking a piece of tape on each key.
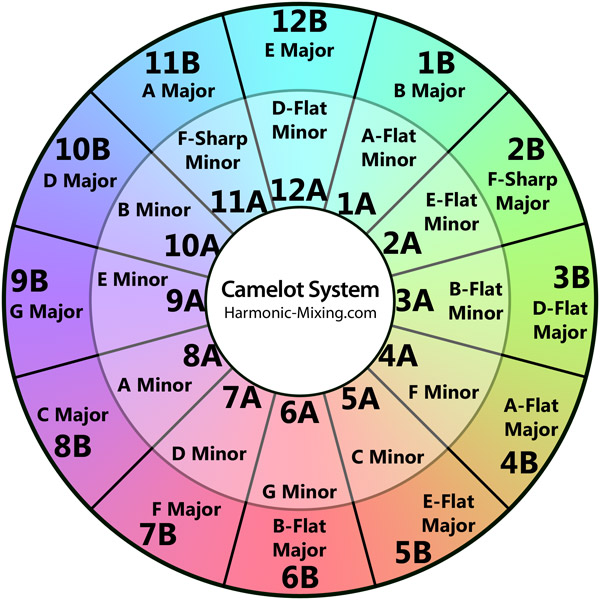
You can now start playing with sounds and using these keys individually come up with some great accompanying melodies or basslines. Or you can use some of these keys in combinations to make complimentary chords. (If the complimentary chord bit is a bit confusing remember you can always refer to the Camelot wheel (below) and then use this chord finder to find complimentary chords.)
Use the same method when working with samples in Minor keys – the process is the same, but in the case of minor chords just use the formula for a minor scale, which is: Tone-Semitone-Tone-Tone-Semitone-Tone-Tone. Again, this will help you to determine what keys make up the minor scale of your root note.
Just memorizing those two patterns and having some coloured tape handy in the studio will begin to build a great foundation for you and really start to open your eyes to the basics of music theory, making your music making a much more enjoyable process. In the end, your track will sound much more professional and pleasing to the ear, because the parts you play in will be in key.
Want a little extra help? There are great tools out now that can help you create great chord progressions without being a trained musician. Check out Loopmasters Deep House & Jazz Chords Ableton Rack, or Plugin Boutique’s Scaler.
Save on great audio plugins at Plugin Boutique. Click to browse all current offers.


 The great loop. Whether it’s Hip-Hop or House, it is more often than not the foundation of a track. In fact, it’s become so much a part of modern music that we now have access to literally millions of pre-produced loops with the click of a mouse.
 Two themes heavily influenced early House & Techno music production – limitation and technology. The intersection of these two things often resulted in the unique style that many of us now associate with that “classic” sound.